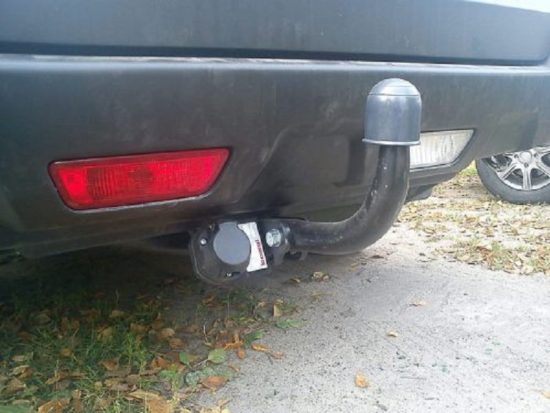
Many car owners who periodically have to deal with the carriage of certain goods, use trailers for transportation. However, so that the car is equipped with a trailer, it is necessary to install a hitch. As for its installation, it is enough to do it yourself. It is much more difficult to connect the electrical wiring of the trailer, which is provided for by the rules of the road.
Content
Passenger Car Trailer Wiring Scheme
To connect the trailer wiring to the machine, two types of outlets are used to 7 and 13 conclusions. The scheme of connecting the socket of the towed vehicle (hereinafter the BTS) also depends on the standard of the country, which is why the trailer with the Russian wiring is impossible without alterations to connect to a rosette with European wiring. If you connect it without alteration, the right gauges of the trailer will not burn that at night there may be a cause of the accident.
Outlets on 13 contacts are used, as a rule, in the cars of the countries of the United States and Europe. Additional contacts that are in the outlet are used to include fog and other electrical equipment.
For example, if we talk about a house-trailer, then in this case, in addition to optics, it will be necessary to display the contacts required to power the various devices used in it.

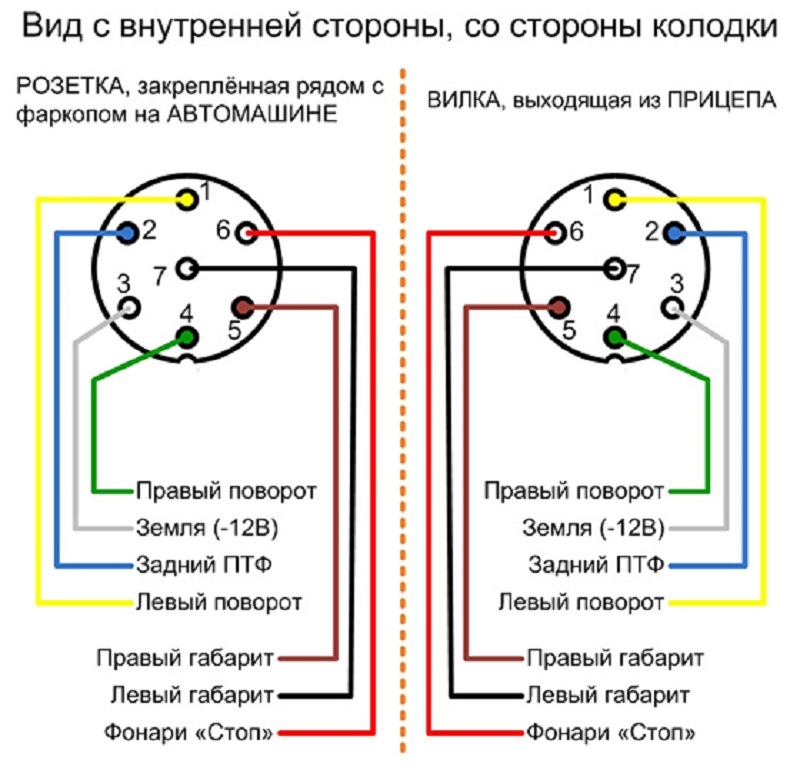
7-contact sockets are used in cars that are operated in the countries of the former USSR. In this case, contacts are applied to connect stop signals, turn signals and overall lights. In both cases, contacts should be mirrored.

Plight Car Trailer Connection Scheme
In order for the car trailer to be properly connected to the onboard network, you need to know which wire to which contact is connected.
The scheme for connecting the trailer of the Russian 7-pin socket in this way:
- Left turning.
- Reverse light bulb.
- Earth.
- Right turning.
- —
- Stop light bulb.
- Dimensions.

But the European (universal) pinout:
- Left turning.
- Reverse light bulb.
- Earth.
- Right turning.
- Right overall lamp and illumination of the room.
- Stop light bulbs.
- Left overall lamp.

They are actually the same, with the exception of the fifth point.
Pinout on 13 terminals:
- Left turning.
- Rear fog lamp.
- Earth for terminals 1-8.
- Right turning.
- Left side illumination of the room and dimensions.
- Stop signal.
- The right side of the illumination of the room and dimensions.
- Reverse light bulb.
- Voltage 12 V 35 amp, which is constant.
- Voltage 12 V 35 amp, which is supplied after turning on the ignition.
- Earth.
- Signal wiring.
- Earth for the 9th terminals.

How to connect the wiring of a passenger car with your own hands?
In principle, when buying a headquard to install on your car with it, all the materials required for connecting are sold. And if not, this kit will need to buy separately.
To do this, you will need:
- Wiring set.
- Packing socket for joining the trailer.
- Fasteners.
- Fastener plate.
- Connecting a trailer device with a pinout outlet.

In addition, you will have to take care of the tools that will be required for work:
- Soldering iron.
- Insulating tape.
- Heat shrink.
- Connecting terminals for wires, if these are not included.
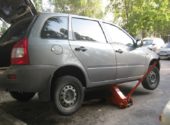
- Drills and drill, if the machine does not provide space for a socket and a hitch.
- Tools for removing the bumper or its trimming.
- Screwdrivers.
- Spanners.
If you do not have a special set to connect the wiring, be sure to choose the stranded wires with a cross section of at least 1.5 mm 2. In addition, copper wires are perfect for wiring. Before starting work, do not forget to remove the terminals from the battery, so as not to expose yourself risk and completely de-energize the network.

With an independent connection of the headcom wiring, you can resort to either a standard connection method, or universal. The first will suit you if on the trailer, and on the hinge your car there are already special connectors that can be connected with the need. In this case, in fact, you only have to carefully examine the pinout of the BTS connector of the BTS car, which can most often be done using the operational instruction of the vehicle. Troat the power grid will not have to be at all.
In all other cases, especially when it is necessary to independently install on the car and the outlet, and the hitch, only the universal connection method is suitable. However, we look at both ways.
standard method
To connect the rosette itself, you must first carefully examine the scheme of its connection and the pinout of the trailer socket. Then you need to find a block of harness of one of the rear lights of the machine. It is necessary that this buzz will need to connect a socket for this, suitable connectors will be applied.

Often in the design of the car provides for a special window, by means of which it is convenient to overtake the wires. However, when connected, you must have one posting, which is necessary for connecting the second turn signal. If we talk about the method of connecting the wires, for this you can or apply surround clips, or fix connections by soldering (from the wires you will need to pre-remove a small piece of insulation).
The most important thing in such work is exactly followed by the Pardark Outlet Connection Scheme. Otherwise, there is a risk of damage not only to the headquart, and the entire wiring of the car.
universal method

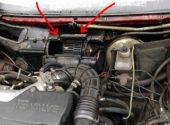
If you have a modern car with an electronic control unit, it is not recommended to apply a standard method. The bottom line is that the electronic unit fully controls the functioning of the rear lighting, and when you interfere with the integrity of the wiring, there is a chance that the computer will give an error and will stop all lighting.

Therefore, besides all listed materials, you will also need to prepare the "coordination" block. It connects to the electrical network of the vehicle. The "matching" block will submit the required signals to the rear lighting, whereas the main electronic unit cannot recognize the additional device and therefore will not prevent the connection and use of the pitch socket. Then follow the fact that both in the first way - connect the wires of the rear lighting of the car and the rosette of the Farkop, without forgetting the need for reliable isolation.

Tips Prof.
In general, to connect the wiring of the pardon is not difficult if you understand the pocket of the pitch and the trailer connections in the pinout. It is also worth remembering that there are different types of sockets, while the trailer socket and the headquart should match. Otherwise you will not succeed in connecting the trailer.
Related Materials
- Stove 2110, bad warm stove 2110, VAZ 2110 heating system, repairing the heating system VAZ 2110 with their own hands
- VAZ 2114 stove blows with cold air, stove 2114, bad warm stove VAZ 2114, device and repair of heating VAZ 2114 do-it-yourself, removing the stove VAZ 2114
- How to subdominize the car. How to put a jack. Types of jacks for cars.
- VAZ 2109 Fuse Block, VAZ 2109 Fuse Block Carburetor, VAZ 2109 Fuse Block Injector, Old VAZ 2109 Fuse Block, VAZ 2109 Fuse Block, VAZ Fuse Block 2109
- Car exhaust gas catalyst, faulty catalyst, pluses and cons of the catalyst, how to change the catalyst for the planeencitel
- Stove blowing cold air VAZ 2114, badly blowing the stove VAZ 2114, why badly blowing the stove VAZ 2114
- How to find out the owner of the car by the number of his car, check the car by the number of the traffic police machine, check the car by the state number of the car for free
- How to choose Used tires, Useful Tips
- Winter car road, pressure in passenger car tires in winter, good battery for the car in winter, whether to warm the car in winter
- In winter, the car is poorly started. How to make a car in winter, do you need to warm up the car in winter, useful tips
- Economy fuel consumption machines, the most economical car consumption
- Tires brands for passenger cars, labeling of car tire labeling, residual passenger car tire protector, how to pick a tire on a car brand, car tire tread pattern
- Working transmission operation, mechanical gearbox clutch work, driving with manual gearbox, useful tips
- Rear beam Peugeot 206 sedan, rear beam device Peugeot 206. Rear beam Peugeot 206 Malfunction, repair of the rear beam Peugeot 206
- Diesel fuel in winter, additive for diesel fuel in winter, how to choose the best diesel fuel
- Diesel winter does not start. How to start diesel in winter, heating diesel in winter.
- Japanese bridgestone tires, winter studded bridgestone tires, bridgestone tires brand
- Tire marking decoding for passenger cars, labeling wheels, how to choose the right tires on the disks
- Diesel engine in winter, launch of the diesel engine in winter, what oil to fill in a diesel engine in winter, useful tips
- LED backlight of the car, the backlight of the bottom of the car, the backlight of the legs in the car, the backlight in the door of the car, the backlight of the car is fine
- Recovered tires, bus tire, restored tire protector, can I use them
- Choose winter tires, which is a winter tires, which pressure in winter tires should be marked with winter tires, how to choose the right winter tires, the best winter tires 2019
- Steering rail rail, knock of steering rack, reasons for the knock and repair of the steering rack do it yourself
- Cameless car tires, a set for repair of tubeless tires, repair of the cannon-free tire do it yourself
- Russian tires, Russian tires Winter, Russian All-season tires, Voronezh AMTEL tires, Tires "Matador Omsk Tire", Kama-tires are world-class bus
- How to open a car without a key. Lost the key from the car what to do, the key from the car inside the car
- Silent tires, quiet winter tires, quiet studded bus, which tires to choose, overview tires
- Tires and safety, safety of the bus, why it is necessary to constantly monitor car tires
- Rules of safe driving of the car in the rain and slush, safe driving of the car for beginners
- Rust converter which is better for cars, rust converters to choose how to use rust transducer, professionals
- Polishing the body of the car do it yourself, how to choose a polishing paste, useful tips
- Engine durability, engine life, how to extend engine life
- Knock in the car. Knock when moving the car. What can knock in the car. How to determine the cause of the knock.
- ABS car, what is ABS car, ABS system malfunction, ABS diagnostics
- Overtaking a car when you can start overtaking a car, rules of traffic rules
- Fuel pump VAZ 2110, VAZ 2110 gas station scheme, VAZ 2110 fuel pump device, VAZ 2110 gas station repair,
- Automotive antennas for radio, automotive antenna device, car antenna do it yourself
- Front suspension Kalina, device front suspension Kalina, knock in front suspension Kalina, repair of front suspension Kalina
- Shock absorber Oil, best oil shock absorbers, pumping oil shock absorbers, how to properly pump oil shock absorber
- Clutch malfunctions, touches clutch, causes a clutch malfunction, how to eliminate


Everything is simple and understandable, thanks. And schemes are clear. I decided to smooth one more moment with the electrical wiring of the trailer: the plastic cable holders quickly embarrassed. I decided using a polyurethane strap-clasp. It is not erased very long, does not break. The price is ridiculous. Recommend.