The nozzle is an important element of the fuel system that is responsible for filing fuel in car injection engines, including VAZ 2109. Below we will talk about the purpose of this part, faults, their causes, as well as methods of eliminating the nozzles breakdowns, including their replacement.
Content
- Injectors VAZ 2109 (injector), device, principle of operation, location
- Signs of Fuel Fuel Injectors VAZ 2109
- Device fuel ramp VAZ 2109
- Dismantling fuel ramp
- How to remove VAZ 2109 nozzles
- Ways of cleaning injectors VAZ 2109
- How to replace old nozzles to new
- Tips Pros: how to choose new nozzles of good quality
Injectors VAZ 2109 (injector), device, principle of operation, location
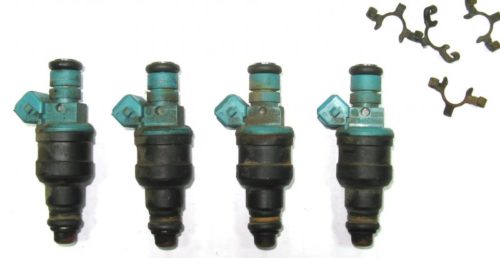
The injector in the VAZ2109 car engine is designed to accurate fuel supply in the intake manifold at different stages of the engine operation. Nozzles are located directly on the fuel ramp of the fuel supply system. One end of each nozzle is inserted into a special fuel frame socket, an arc end is in the engine intake manifold.
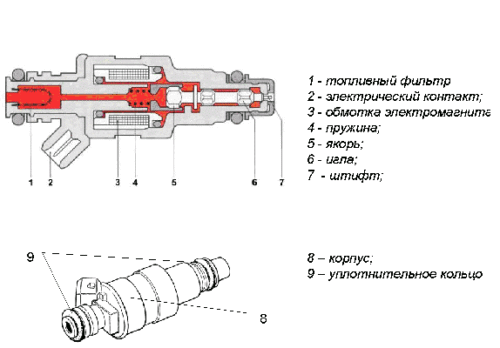
The nozzle is a simple fuel supply device having an electromagnetic shut-off needle valve. From the fuel ramp inside the nozzles through the fuel filter under high pressure comes fuel. Inside the collector, it is injected through the sprayer, on the inlet valve.
There are four calibrated holes on the surface of the sprayer. Inside the case is a small electromagnet. When electricity is served on the magnet, it raises the needle, passing fuel. When the magnet is de-energized, the return spring returns the needle to its original position overlapping the fuel supply.
The planting place of the nozzle on the fuel frame has a seal made from rubber rings. In addition, the nozzle is additionally fixed by a special corkscone bracket. The electromagnet is equipped with leads that are placed in the junction block of the nozzle. In this place they join the harness of the Wires of Esud.
The principle of operation of the nozzle is as follows: inside the part of the fuel ramp of the fuel supply system constantly comes fuel at high pressure. The control pulse (controller) at a certain point supplies the voltage to the electromagnet of the nozzle, opening the valve. In this case, the fuel that is under pressure is supplied directly to the sprayer, after which it is injected into the collector in the form of a so-called conical torch.
Inside the collector, fuel turns into an air mixture and is absorbed into the cylinders through the inlet valve. The opening time of the nozzle valve, and, accordingly, the amount of fuel that enters the cylinder is regulated by the controller and depends on the time of operation of the engine (the duration of the impulse). As soon as the valve is de-energized, the stopping needle returns to its original position, and the fuel supply is stopped.
Signs of Fuel Fuel Injectors VAZ 2109
If a bad low-quality fuel is used or the nozzle nutrition system is contaminated, they may fail. In this case, the fuel from the nozzles is not sprayed, but begins to drip or flow. The formation of an air-fuel mixture is broken, as a result - the engine works with interruptions on different revs. Power and pickup is strongly falling, the car moves by jerks, there are failures and jerking in the engine.
If the nozzle valve needle hangs out in the open position, it may be ignition after stopping the engine, the so-called detonation, as the fuel continues to flow. The electrical part of the nozzle can be broken. This may happen due to the wiring cliff or short circuit. In this case, the nozzle repair is not subject to and it is necessary to replace it. The contaminated nozzle can be washed. This uses a special stand. After washing, the operation of the nozzle is restored for a while.
Device fuel ramp VAZ 2109
The fuel ramp, or, as it is also called, the ramp of the nozzles is one of the main elements of the fuel supply system in the engine of injection type VAZ 2109. The main purpose of the fuel ramp is the fastening of the nozzles and the fuel fuel on them. In the injection engine of the car VAZ 2109 ramp is located on the intake manifold. The ramp is attached to two hexagon bolts on "5".
Rampa on the "Nine" engines is a rail, empty inside. From one end to the rail, the fuel supply hose from the tank is attached. At the other end there is a fitting for controlling the pressure of fuel in the fuel system. In addition, all four nozzles and fuel pressure regulator are attached to the ramp. Nozzles are mounted with retainer spring brackets through a sealing rubber ring.
The principle of operation of the ramp is as follows: The fuel pump shakes fuel from the tank in the ramp (pressure 2.8 - 3.2 atmospheres). The pressure inside the ramp is regulated by the pressure regulator, which is fixed on the ramp (excess fuels are reset back into the benzobac through the return highway). According to the command coming from the controller, the fuel from the ramp through the nozzles is injected into the engine cylinders.
Of the most common fault ramps, it can be noted its mechanical damage and depressurization of compounds (in places of fastening the nozzles, fuel tube, pressure control fitting). All malfunctions without much difficulty are detected at visual inspection of the ramp. These may be leaks of fuel, deformation, dents, other damage.
Dismantling fuel ramp
This is the most inconvenient and problematic stage of work on replacing the injectors, so consider it in more detail.
The following tools, devices and consumables will be needed for work:
• Cross and flat screwdriver.
• Hex key to "5".
• Horn key to "10".
• Two horn keys on "17".
• Nozzle, rubber sealing rings.
So, to remove the fuel ramp you need to do the following manipulations:
• First, we turn off the "mass" on the battery in order to avoid short circuit.
• Reset the pressure in the fuel ramp (click on a second by the cross screwdriver to the fitting valve).
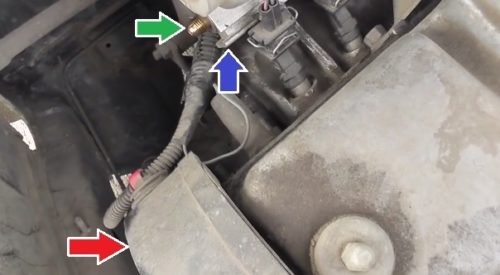
• Turn off the power from the idle sensor. It is enough just to squeeze the plastic lock of the block.
• Disconnect the block with wires that feed the nozzles.
• Turn off two hoses - supply and drain fuel pipes. To do not confuse when the back assembly does not confuse where to connect, one hose can be labeled.
• Unscrew the ramp mounting bolts to the inlet tube.
• Fuel tubes holds a special mount to weaken it, you need to unscrew one screw.
• We shift the fuel ramp along the axis of the nozzles - they must come out of their seats.
• The ramp assembly is performed precisely in the reverse order.
An important point: under bolts that ramp mounted to the engine are washers, they must be returned to the place when reverse assembly.
How to remove VAZ 2109 nozzles
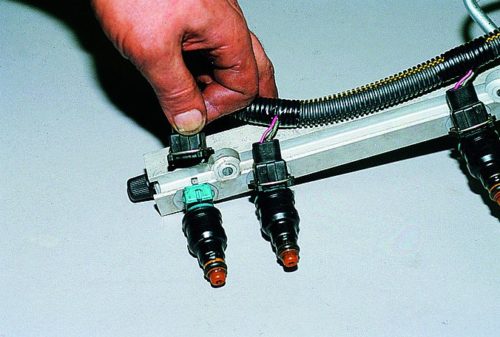
• After the ramp is dismantled, it should be put on a flat surface, for example on the table. Next, the nozzles are disconnected from the outbreak. For this, the spring fastening bracket is compressed, after which you can disconnect the block itself.
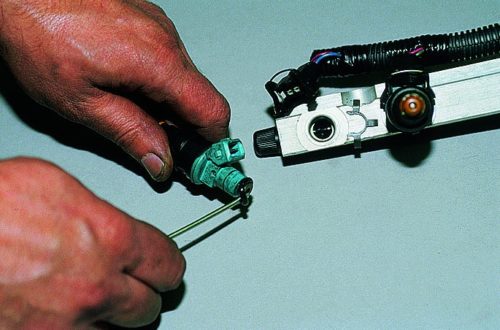
• Next, a flat screwdriver must be moved to the ramp metal retainer. His destination is to securely fix the fuel sprayer. Some car enthusiasts for some reason remove the lock completely although there is no need for this. It just needs to move a little to the side.
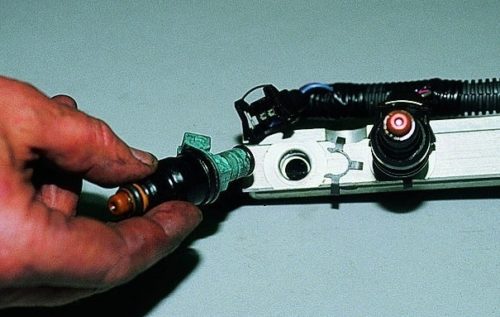
• You need to take a nozzle with your hand and slightly shake from side to the side. The nozzle should be out of the fuel ramp without much resistance. After that, you need to immediately check the state of the rubber sealing ring.
• In addition, it should be checked, in what state is the sealing ring of the nozzle sprayer. To do this, a flat screwdriver should carefully pose both rings and inspect them for wear.
• In the case of the fuel nozzle, if the sprayer itself changes, then it is not necessary to change the sealing ring if it is not worn. However, if the ring will be reused, it is necessary to lubricate it before installing it.
• After the nozzle was removed and the sealing ring was filmed (or put the old one), you can start installing new items. All work is done strictly in reverse order.
• The nozzle is inserted into its place in the fuel ramp, fixed.
• The block with wires is installed in place.
Ways of cleaning injectors VAZ 2109
It should be noted that the replacement of nozzles is not always the only and justified way to restore the performance of the sprayer. The nozzle can be tried to clean, especially since it is easy, and you can save quite well.
There are two most common cleaning methods of contaminated nozzles, each of which has its advantages and disadvantages. Which one to choose is a choice for the car enthusiast.
fashion first
For work you will need:
• Injector cleaner.
• Spray cleaner for carburetor.
• New sealing ring.
The work algorithm is as follows:
I remove all the nozzles (even if only one has been hammered, it does not hurt everything).
We place the nozzle into the container with the means for injectors, we leave there for a while.
At this time, we rinse the idling regulator using a carburetor cleaner.
We clean the net around the nozzles of the nozzles manually - it resembles a resin on the consistency. With Nagar will have to tinker. This is called external nozzle cleaning.
As for the internal cleaning, then you will need a power source with a voltage of 3 to 12 volts (a car battery is suitable), as well as a foot pump having an mounted pressure gauge.
From the end of the pump hose, remove the tip, fill in the hose a bit of the injection cleaner, put the hose on the nozzle. After that, pumped pressure up to 6 atmospheres, focusing on the pump pressure gauge. After that, on the nozzle you need to submit a voltage of three volts. If the electromagnet did not work (nozzle not clicked), it is necessary to increase the voltage.
The voltage on the nozzle must be served by jerks for a short time, periodically pulling pressure. In the same way, blow all the nozzles.
method of the second
For work will be needed:
• Space for carburetors.
• Pump with pressure gauge.
• Sealing ring.
• Instead of a cleaner for injectors, use spray.
• In turn, we repeat all the manipulations that were described in Method No. 1, using the cleaner for carburetors.
• Be sure to perform outer cleaning of the nozzle to remove Nagar.
• Apply spray to clean rags and carefully wipe all nozzles outside.
• Gradually, under the influence of the spray of the Nagar soften, and it will easily become sulking. You can carefully use a toothpick or a flat screwdriver.
• Before installing the nozzle into place, it is necessary to lubricate sealing rings with a solution of the economic soap.
And the first and second way of time takes no more than 3 hours, and in money they cost dozens of times less than the same service for a hundred. After cleaning the nozzles, check them in operation - if there is no result, the nozzles will have to be changed.
How to replace old nozzles to new
The fuel frame is dismantled with all the nozzles:
Squeeze the spring lock, disconnect the nutrition of the nozzle:
Lightly swaying from side to the side, carefully remove the nozzle:
Slightly approaching the screwdriver, remove the sealing ring:
Remove the ring from the sprayer:
Installing new nozzles is made strictly in the reverse order.
Tips Pros: how to choose new nozzles of good quality
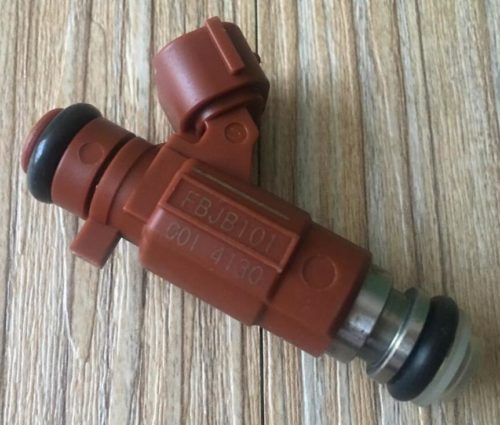
It will most correctly look for new nozzles for your car, focusing on the VIN code. It is explained by the fact that almost all parts of the injection motor belong to one type, fitted with each other. If you select an error when selecting nozzles, the engine will start "troit" and loses power.
It should be noted that relying only on the technical characteristics, it is unlikely to choose a suitable new nozzle. The fact is that, models of one line, but different years of release, can be equipped with different details. In this situation, the best way out is to learn the codes of old nozzles and find the same.
Important moment: do not confuse nozzles for gasoline with gas nozzles. They work in different ways. Thus, the gas nozzle is characterized by the fact that it has a small resistance - if you have 12 volts to submit it, it will immediately burn.
As for manufacturers, then, of course, it is recommended to buy products of proven brands. This is, first of all, Siemens, Bosch (Germany), Delphi (USA). Altek, OMVL (Italy), Hana (South Korea) are suitable of cheaper options.
Related Materials
- Stove 2110, bad warm stove 2110, VAZ 2110 heating system, repairing the heating system VAZ 2110 with their own hands
- VAZ 2114 stove blows with cold air, stove 2114, bad warm stove VAZ 2114, device and repair of heating VAZ 2114 do-it-yourself, removing the stove VAZ 2114
- How to subdominize the car. How to put a jack. Types of jacks for cars.
- VAZ 2109 Fuse Block, VAZ 2109 Fuse Block Carburetor, VAZ 2109 Fuse Block Injector, Old VAZ 2109 Fuse Block, VAZ 2109 Fuse Block, VAZ Fuse Block 2109
- Car exhaust gas catalyst, faulty catalyst, pluses and cons of the catalyst, how to change the catalyst on the planeencitel
- Stove blowing cold air VAZ 2114, badly blowing the stove VAZ 2114, why badly blowing the stove VAZ 2114
- How to find out the owner of the car by the number of his car, check the car by the number of the traffic police machine, check the car by the state number of the car for free
- How to choose Used tires, Useful Tips
- Winter car road, pressure in passenger car tires in winter, good battery for the car in winter, whether to warm the car in winter
- In winter, the car is poorly started. How to make a car in winter, do you need to warm up the car in winter, useful tips
- Economy fuel consumption machines, the most economical car consumption
- Tires brands for passenger cars, labeling of car tire labeling, residual passenger car tire protector, how to pick a tire on a car brand, car tire tread pattern
- Working transmission operation, mechanical gearbox clutch work, driving with manual gearbox, useful tips
- Rear beam Peugeot 206 sedan, rear beam device Peugeot 206. Rear beam Peugeot 206 Malfunction, repair of the rear beam Peugeot 206
- Diesel fuel in winter, additive for diesel fuel in winter, how to choose the best diesel fuel
- Diesel winter does not start. How to start diesel in winter, heating diesel in winter.
- Japanese bridgestone tires, winter studded bridgestone tires, bridgestone tires brand
- Tire marking decoding for passenger cars, labeling wheels, how to choose the right tires on the disks
- Diesel engine in winter, launch of the diesel engine in winter, what oil to fill in a diesel engine in winter, useful tips
- LED backlight of the car, the backlight of the bottom of the car, the backlight of the legs in the car, the backlight in the door of the car, the backlight of the car is fine
- Recovered tires, bus tire, restored tire protector, can I use them
- Choose winter tires, which is a winter tires, which pressure in winter tires should be marked with winter tires, how to choose the right winter tires, the best winter tires 2019
- Steering rail rail, knock of steering rack, reasons for the knock and repair of the steering rack do it yourself
- Cameless car tires, a set for repair of tubeless tires, repair of the cannon-free tire do it yourself
- Russian tires, Russian tires Winter, Russian All-season tires, Voronezh AMTEL tires, Tires "Matador Omsk Tire", Kama-tires are world-class bus
- How to open a car without a key. Lost the key from the car what to do, the key from the car inside the car
- Silent tires, quiet winter tires, quiet studded bus, which tires to choose, overview tires
- Tires and safety, safety of the bus, why it is necessary to constantly monitor car tires
- Rules of safe driving of the car in the rain and slush, safe driving of the car for beginners
- Rust converter which is better for cars, rust converters to choose how to use rust transducer, professionals
- Polishing the body of the car do it yourself, how to choose a polishing paste, useful tips
- Engine durability, engine life, how to extend engine life
- Knock in the car. Knock when moving the car. What can knock in the car. How to determine the cause of the knock.
- ABS car, what is ABS car, ABS system malfunction, ABS diagnostics
- Overtaking a car when you can start overtaking a car, rules of traffic rules
- Fuel pump VAZ 2110, VAZ 2110 gas station scheme, VAZ 2110 fuel pump device, VAZ 2110 gas station repair,
- Automotive antennas for radio, automotive antenna device, car antenna do it yourself
- Front suspension Kalina, device front suspension Kalina, knock in front suspension Kalina, repair of front suspension Kalina
- Shock absorber Oil, best oil shock absorbers, pumping oil shock absorbers, how to properly pump oil shock absorber
- Clutch malfunctions, touches clutch, causes a clutch malfunction, how to eliminate











Comments