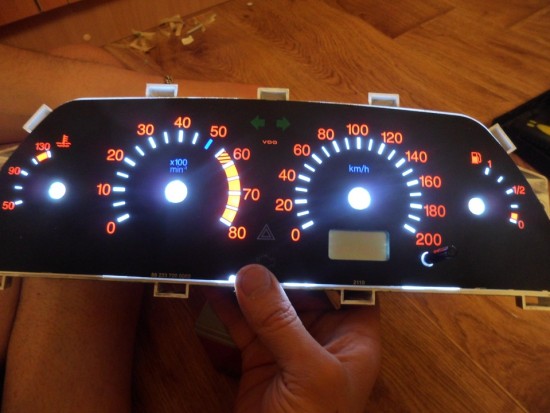
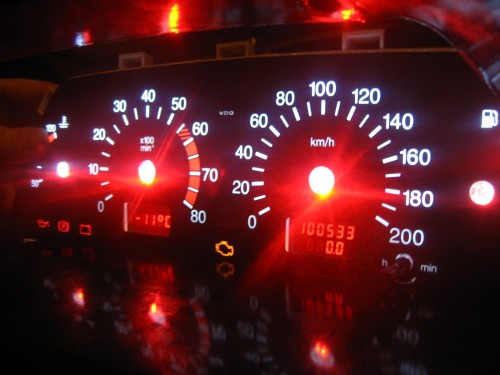
Probably, every motorist, which is the owner of the car of the VAZ family, wants to upgrade its dashboard. On modern foreign cars, the dial of devices from the inside is highlighted, which looks very attractive, as if the numbers shine and the devices itself. But the instrument panels of VAZ cars are highlighted by conventional lamps, which emit light on the dials from the arrows, from the outside. At the same time, the brightness is low, and the detail of this backlight is little effective. That is why most owners of such cars very often improve the instrument panel using the backlight. In addition, it is quite easy to make it yourself.
Content
- Illumination of carbon panels VAZ, how to make backlight with your own hands
- Illumination of the instrument panel VAZ 2114
- How to change the color of the scale of instruments from the car VAZ
- How to install LEDs instead of incandescent lamps on the car panel VAZ
- How to make the backlight of the arrows of the instruments on the car VAZ
Illumination of carbon panels VAZ, how to make backlight with your own hands
To independently make a tuning backlight on VAZ models cars, you do not need to have special skills, but in a specialized company this procedure will cost anything expensive. You can try to make the dashboard backlight from the inside, as on modern cars.
To work, you will need a light-up standard pad for the dashboard. The instrument panel from the vehicle must be removed and disassembled. Do not forget also to dismantle the old lining and arrows of the appliances. So that the backlight light falls from the inside to the lining, the special cuts should be made under the overlay with a heated knife or soldering iron.
Then go directly to the backlight. It will be organized using LED tape. It is necessary to choose a tape that can be easily cut into small parts, three diodes. Regarding the uniformity of the glow, then it is made from the usual foil using the reflector. For the speedometer and the tachometer we take three parts of the tape, and for pointers of the fuel level and the coolant temperature, one by one.
The standard highlighting of the VAZ should be saved, as its task will be the backlight of the arrows on the instrument scale. If you wish, it can also be upgraded if it is possible to glue the LED tape in the place of the standard lamps. So that the highlighting is not too bright, you can toned it a little. Toning is carried out using a tint film or a black marker. The regular light filter is better left, then the backlight will be soft and uniform with a bluish tint.
Connect all follows to the contacts on the plate lamp plate, pre-determining their polarity. In order to stabilize the current, it is advisable to use the driver to power the LEDs.
Illumination of the instrument panel VAZ 2114
First you need to remove the main lighting lamps together with the cartridges. Next, very carefully remove the arrows, going on with something thin. You can simply turn them around the restrictions and slow down from the axis. At this time, there are a lot of varieties of panels. On one of their part, the arrow drive is attached on the main board, and on the other - on the basis of the plexiglass.
After that, it is necessary to gently remove the insert from the plexiglass. Wear it from the edge and just tear off. The sticky layer should not be contaminated or erased. Insert needs to flip and put on a clean surface. With the help of a blade we erase green spraying, which is noticeable in the area of \u200b\u200bnumbers. Now you can collect plexiglas and insert.
How to change the color of the scale of instruments from the car VAZ
It is necessary to take a piece of plastics and scissors. Cut out the contours in such a way that the plastic will fit into the bulk. Also cut out space for arrows drives. Next, we apply marking for LEDs. For fuel you need three LEDs, for temperature - four. Then set the instrument panel for each scale.

Now, guided by markups, make holes for LEDs and resistance. This can be done by a hot seer or a small drill. The top of the LED should be drowning, as the lens is mounted for the focus of the beam. It is important not to damage the light element itself. LEDs should be soldered in parallel with each other and consistently with resistance.
How to install LEDs instead of incandescent lamps on the car panel VAZ
First, the base of the LEDs must be inserted into the housing and display the connection wires. Next, we make an insert from the plexiglass with the body. Plexiglas should be inserted tightly. From the opposite side, we screw in four screws. Then install the fee. Carefully, the pins of the wires from the arrows should not be brought. Next, we fasten with self-draws or screws. Now we solder to the power supply of any regular lamp power LEDs. We put on the arrows and exhibit them on zero.
How to make the backlight of the arrows of the instruments on the car VAZ
To do this, you will need:
- Fluorescent marker.
- Super glue or glue moment.
- Not power wires.
- Ultraviolet light bulb.
- Insert in the instrument panel of the desired model.
- Soldering iron.
The plastic and the dashboard must be removed, then disassemble it, remove the black plastic and glass, then carefully remove the arrows, then the standard insert. We make holes if there are no them in the new insert. So that the arrows did not stick, it is advisable to make holes a little more than they were in the factory insert. Now you can take out the regular backlight and board with light bulbs.
The neon lamp should be glued on the panel from above, replace the standard backlight and take plastic protection from above. At the top should be attached to the control unit of the neon lamp. Observing polarity, connect the lamp in the place of the standard backlight.
Now mount two lamps on the device. All wires connect and stretch inside partitions. Connect to the point of food and put the lamp. Wires carefully fastened to plastic. Arrows paint the marker several times. Next, we collect and install the instrument panel.
Related Materials
- Stove 2110, bad warm stove 2110, VAZ 2110 heating system, repairing the heating system VAZ 2110 with their own hands
- VAZ 2114 stove blows with cold air, stove 2114, bad warm stove VAZ 2114, device and repair of heating VAZ 2114 do-it-yourself, removing the stove VAZ 2114
- How to subdominize the car. How to put a jack. Types of jacks for cars.
- VAZ 2109 Fuse Block, VAZ 2109 Fuse Block Carburetor, VAZ 2109 Fuse Block Injector, Old VAZ 2109 Fuse Block, VAZ 2109 Fuse Block, VAZ Fuse Block 2109
- Car exhaust gas catalyst, faulty catalyst, pluses and cons of the catalyst, how to change the catalyst for the planeencitel
- Stove blowing cold air VAZ 2114, badly blowing the stove VAZ 2114, why badly blowing the stove VAZ 2114
- How to find out the owner of the car by the number of his car, check the car by the number of the traffic police machine, check the car by the state number of the car for free
- How to choose Used tires, Useful Tips
- Winter car road, pressure in passenger car tires in winter, good battery for the car in winter, whether to warm the car in winter
- In winter, the car is poorly started. How to make a car in winter, do you need to warm up the car in winter, useful tips
- Economy fuel consumption machines, the most economical car consumption
- Tires brands for passenger cars, labeling of car tire labeling, residual passenger car tire protector, how to pick a tire on a car brand, car tire tread pattern
- Working transmission operation, mechanical gearbox clutch work, driving with manual gearbox, useful tips
- Rear beam Peugeot 206 sedan, rear beam device Peugeot 206. Rear beam Peugeot 206 Malfunction, repair of the rear beam Peugeot 206
- Diesel fuel in winter, additive for diesel fuel in winter, how to choose the best diesel fuel
- Diesel winter does not start. How to start diesel in winter, heating diesel in winter.
- Japanese bridgestone tires, winter studded bridgestone tires, bridgestone tires brand
- Tire marking decoding for passenger cars, labeling wheels, how to choose the right tires on the disks
- Diesel engine in winter, launch of the diesel engine in winter, what oil to fill in a diesel engine in winter, useful tips
- LED backlight of the car, the backlight of the bottom of the car, the backlight of the legs in the car, the backlight in the door of the car, the backlight of the car is fine
- Recovered tires, bus tire, restored tire protector, can I use them
- Choose winter tires, which is a winter tires, which pressure in winter tires should be marked with winter tires, how to choose the right winter tires, the best winter tires 2019
- Steering rail rail, knock of steering rack, reasons for the knock and repair of the steering rack do it yourself
- Cameless car tires, a set for repair of tubeless tires, repair of the cannon-free tire do it yourself
- Russian tires, Russian tires Winter, Russian All-season tires, Voronezh AMTEL tires, Tires "Matador Omsk Tire", Kama-tires are world-class bus
- How to open a car without a key. Lost the key from the car what to do, the key from the car inside the car
- Silent tires, quiet winter tires, quiet studded bus, which tires to choose, overview tires
- Tires and safety, safety of the bus, why it is necessary to constantly monitor car tires
- Rules of safe driving of the car in the rain and slush, safe driving of the car for beginners
- Rust converter which is better for cars, rust converters to choose how to use rust transducer, professionals
- Polishing the body of the car do it yourself, how to choose a polishing paste, useful tips
- Engine durability, engine life, how to extend engine life
- Knock in the car. Knock when moving the car. What can knock in the car. How to determine the cause of the knock.
- ABS car, what is ABS car, ABS system malfunction, ABS diagnostics
- Overtaking a car when you can start overtaking a car, rules of traffic rules
- Fuel pump VAZ 2110, VAZ 2110 gas station scheme, VAZ 2110 fuel pump device, VAZ 2110 gas station repair,
- Automotive antennas for radio, automotive antenna device, car antenna do it yourself
- Front suspension Kalina, device front suspension Kalina, knock in front suspension Kalina, repair of front suspension Kalina
- Shock absorber Oil, best oil shock absorbers, pumping oil shock absorbers, how to properly pump oil shock absorber
- Clutch malfunctions, touches clutch, causes a clutch malfunction, how to eliminate


Comments