The starter is a complex electromechanical device, without which your car is no more than a chest of iron. Of course, you can make the car with some alternative way, but this is a completely different story. Quite often, the starter whose task is to launch the power unit, it can fail and fail. In this case, it will be necessary to repair. About this further in the article.
Content
- Starter 2109 Device and action principle
- Why does not twist starter 2109, possible causes
- Starter 2109 turns, and the machine does not start, possible causes
- Possible faults starter VAZ 2109
- If the machine does not start, you need to check the driver
- Tools, fixtures, consumables
- Safety at work
- How to disassemble the starter VAZ 2109 (step by step)
- Repair work when disassembling the starter VAZ 2109
- How to collect and install the starter VAZ 2109
- Tips Prof.
Starter 2109 Device and action principle
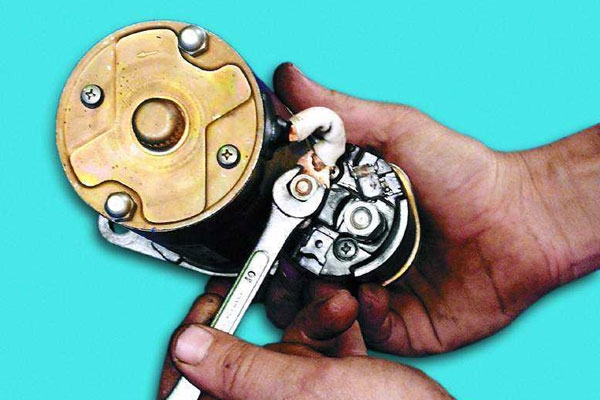
On all cars, without exception, the starter is responsible for starting the motor, or rather, for the briefing of the crankshaft. In fact, it is a small electric motor. The starter device includes: Bendix with brushes, two windings, as well as a movable rotor. How does all this function? Around the rotor and stator windings, magnetic fields are created that have opposite values, which leads the movable element into action. It is simple to file a voltage at the starter, but the Rotor needs an intermediary - brushes, which consist of copper and graphite.
As for the Bendix starter, this component transfers rotation to the flywheel. The part consists of such parts: a plug that connects the mechanism with a retractor relay, gear and overtaking coupling. Many car owners faced the situation when this element is erased. If the Bendix is \u200b\u200bsinking, it is well audible. In this case, the installation of the new kit is inevitable. And although the cause does not raptly serve the contamination of the mechanism, it is not recommended to clean it. Because of the soot and dust, Bendix wear out, often unevenly, and even after cleaning will not be able to perform its functions at the proper level.
Why does not twist starter 2109, possible causes
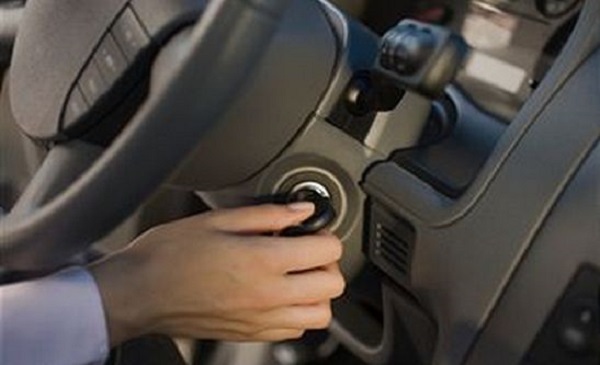
If the starter does not twist, attention should be paid to what will happen during the rotation of the ignition key to the starter's inclusion position. Options for the further development of the event three:
- Multiple clicks are heard.
- A single click is heard.
- I can not hear anything.
The cause of a single click during the rotation of the ignition key is either a traction starter relay, or the ignition relay. Check all the connectors on the trailer relay and directly the starter. If this clicks a trailer relay, check the following things:
- Starter brushes wear.
- Burning contacts on the relay.
- Perhaps a fork broke, pushing the bendix starter.
- The starter is not able to turn the crankshaft for some reason.
If you hear multiple clicks, then the voltage on the traction relay is not enough to turn it on. Causes of low voltage on the relay:
- On the battery terminals bad contact.
- Sorted battery.
If you can not hear anything while turning the key, check whether the dashboard is lit. Maybe the mass just fell off the battery. If the dashboard is glowing, then the reasons for which the starter does not twist, such:
- Short circuit. If a short circuit occurs in the starter, it begins to warm and appears a characteristic smell and even smoke.
- Faulty ignition relay.
- Contact group collapsed in the ignition lock.
Starter 2109 turns, and the machine does not start, possible causes
Frequently often occasion when the starter twists, but the engine refuses to start. So, if the starter rotates the crankshaft, it means that something does not come to the cylinder: the spark or fuel mixture. First of all, we are looking for a spark, for what to remove the high-voltage wire from any candle, bring to the mass to the distance of the centimeter and scroll through the starter.
If the spark plug is not on, check if it is on the timer. To remove this central wire from the distributor, hold the weight at a distance of a centimeter and scroll starter. When overshoot sparks from the wiring to the weight it can be concluded that the problem lies in the ignition distributor: check slider, strip contacts.
If the spark is not on timer, so it needs the ignition system diagnostics. There are two versions of the following troubleshooting:
- Application of the ignition system diagnostic device.
- Manual detection of the fault.
If you have a device, connect it to break the switch circuit. With the switch, remove the connector and connect to the connector device. The second device connector put to the switch. Next, turn on the ignition: must light the lamp of the Hall sensor supply and the lamp power of the ignition system. When rotating the starter should blink: lamp with pulses of the Hall sensor and switch control lamp. If the switch control lamp does not blink, replace the switch.
If the Hall sensor pulses are not disassemble the distributor to be sure that the slider tramblera revolves while rotating starter. If the starter motor rotates and the slider does not, then torn timing belt. If the runner is spinning but there is no signal from the Hall sensor, the Hall sensor change.
If the spark is there, but the engine does not start, remove air cleaner cover. Try to start the engine without the filter cover. When started up, so the air does not flow to the carburetor, the filter is clogged or filled with oil.
If you do not start, completely remove the filter cover and remove the fuel hose from the fuel pump to the carburetor. After cranking the fuel should splash. If not squirting, then broke down the fuel pump or the fuel tank is not supplied.
If fuel splashes when turning the starter unscrew the return fuel line hose from the carburetor. Obratku caulk with your finger and when the wind blows in the mouth feed. If the float chamber air passes, means fuel also passes, and it is necessary to purge the carburetor compressed air.
If the air does not flow into the float chamber, make sure the mesh filter of the carburettor. Remove it and clean. If does not work, probably stuck the needle valve. It should knock wrench carburettor side or blow compressed air supply opening. If you can not blow out the air, change the needle valve.
If the air passes when the lid is removed, but does not pass when the fuel jets are clogged with the carburetor. In this case, the carburetor should be completely purged. But if after the activities of the activities have done, it does not start, you need to unscrew the candles and check whether they are filled with fuel. If soaked - dry.
The above techniques will help to make the VAZ 2109 more than 90 percent of cases. But with difficult to diagnose problems, such as poor or missing compression in the motor, slipped the timing belt, the carburetor is not adjusted, you should contact a hundred.
Possible faults starter VAZ 2109
| Cause of starter breakage | A method of eliminating breakdown |
| When the starter is turned on, the anchor does not rotate, the control devices do not function, the relay does not work | |
| 1. Fully discharged or malfunction of the battery 2. The tips of the wires and the battery terminals are strongly oxidized, lugs are poorly tightened. 3. Mixless closure of the retractive winding of the relay, breaking or closing the winding of the retractor relay on the "mass" 4. Relay power circuit break 5. Malfunction of the contact part of the ignition lock: contacts "50" and "30" do not closes 6. Hences anchor of the retractor relay |
1. Charge either replace the battery 2. Clean the tips of the wires and the battery terminals, tighten and lubricate them with vaseline 3. Replace the retractor relay 4. Check the wires, as well as their connections in the chain between the ignition lock and the "50" plugs 5. In this case, replacement of the contact part of the ignition castle will help 6. You need to remove the traction relay and check the ease of movement of the anchor. |
| When the starter is turned on, the relay works, the anchor rotates very slowly or does not rotate at all | |
| 1. discharged or malfunction of the battery 2. The lugs of the wires and the battery terminals are oxidized, the tips are poorly tightened 3. Weakening the fastening of the wire tips, which connects the motor with the body 4. Contact relay bolts oxidized or weakened the fastening nuts of the wires of the wires on these bolts 5. burned the collector, brushes depended or worn out 6. Circuit or cliff in anchor winding |
1. Replace either charging the battery 2. Clean the tips of the wires and the battery terminals, tighten and lubricate them with vaseline 3. You need to pull the fastenings of the lugs of the wire 4. It is necessary to clean the contact bolts and tighten the fastening nuts of the wires 5. It is necessary to clean the collector and replace brushes 6. Replace the anchor |
| While turning on the starter, the relay works repeatedly and disconnected | |
| 1. Discharged AKB 2. Circuit or opening in the retractor relay 3. The voltage in the power supply circuit of the retractor relay as a result of a significant oxidation of wire tips |
1. Charge the battery 2. Replace the relay 3. Check the wires and their connections in the circuit from the battery to the plug "50" starter |
| While turning the anchor starter rotates, and the flywheel is not | |
| 1. Damage to the pinion gear 2. stalled freewheel |
1. Replacing damaged pinion gear 2. Check on the bench and change the starter clutch |
| Starter strange noise during the rotation of the armature | |
| 1. Excessively worn liners starter drive shaft bearings and the armature 2. The starter mounting weakening or broken from the lid side actuator 3. Damage to the pinion gear 4. Starter is attached with a warp 5. Damaged teeth flywheel or the drive gear 6. The gear does not come out with the engagement with the flywheel: a) zaela clutch splined drive shaft b) seized the relay armature |
1. Replace liners and covers, or support with inserts 2. Tighten the mounting nuts or replace the starter 3. Replacing damaged gear 4. It is necessary to check the starter 5. Replace the flywheel or the drive 6. Do the following: a) the need to clean and lubricate the splines of motor oil b) the need to replace relays or eliminate seizure |
If the car will not start, you need to check the driver
If your car does not start, first check whether there is fuel in the tank. It is possible that you are in their carelessness just forgot to fill it. But if there is fuel, but the engine does not start, you should check such systems:
- Check the battery. Perhaps he is discharged.
- Next, check the spark. It is likely that the candles are filled with fuel and wet candles are not able to give a spark.
- Check whether the fuse is blown - the injector can not be started if at least one of the fuses fails.
- Check the starter.
- Check fuel supply.
- Check the air filter. Perhaps it is clogged.
These reasons are the most common, because of which the engine will not start, but apart from them there are also many others.
Tools, fixtures, consumables
To disassemble a starter, you will need these tools and materials:
- Passatia.
- Snap ring pliers.
- Spanner wrenches or spanners to "17", "13" and "10" mm.
- Hammer.
- Flathead screwdriver.
Safety at work
Before removing starter sure to disconnect the negative terminal of the battery.
As starter disassemble 2109 (incrementally)
Order of work:
- Remove the starter from the car.
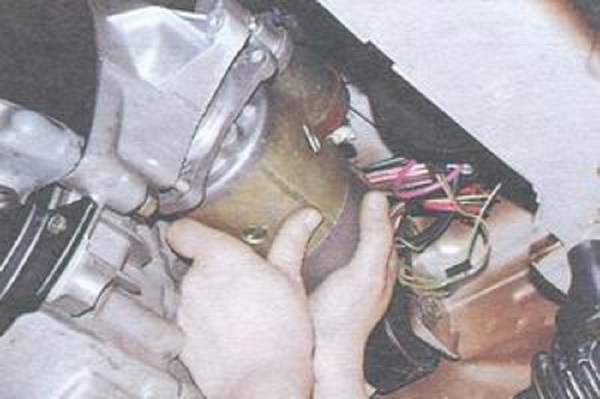
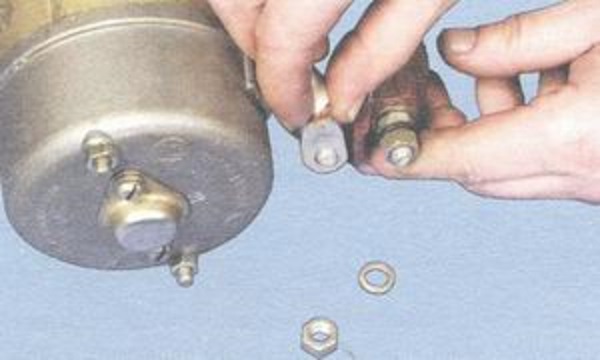
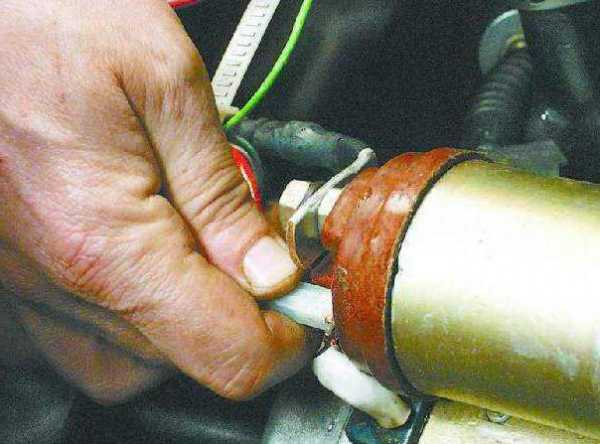
- On the starter turn away a nut of the lower contact relay bolt.

- Remove washer and disconnect the output winding of the stator tip.
- We turn around the two fastening screws relay.
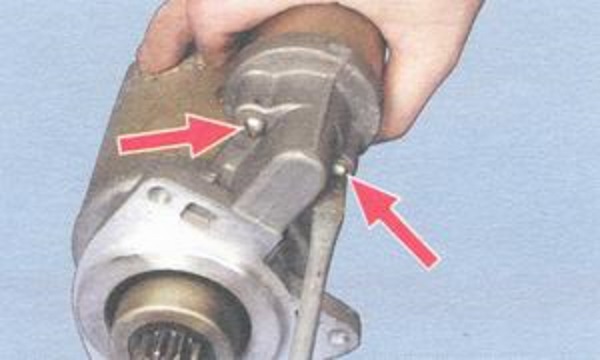
- Remove the relay, for which you need to disconnect the anchor from the lever, lifting the starter relay.

- We take out anchor and spring out of the relay.
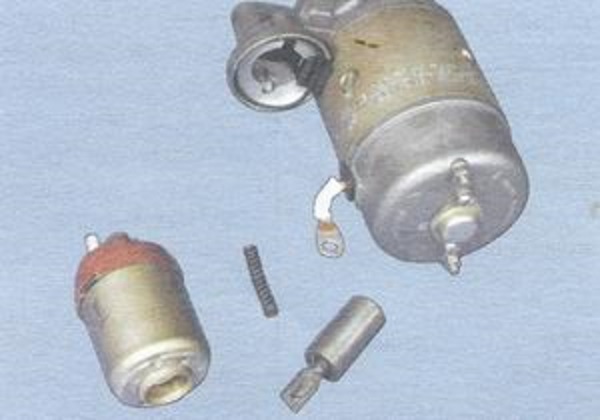
- Remove the sealing ring.

- With the help of a tube suitable for diameter, restrict the restrictive ring from the locking ring.

- Remove the lock, and then the restrictive ring.
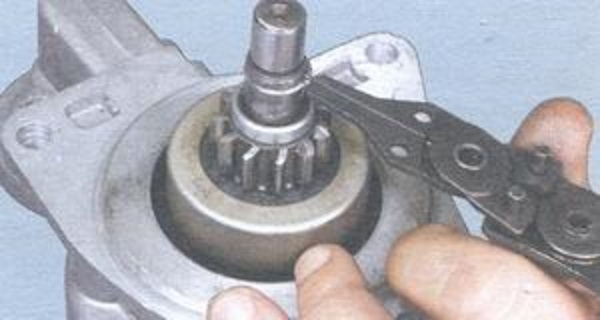
- We turn the two mounting screws and remove the starter protective cover.

- Remove the lock ring.

- Remove the adjusting washers.

- We turn off the nuts of the tie spills.

- From the header side, remove the starter cover.

- Screwdriver press the springs of insulated brushes and remove the brushes from the brush holder.

- Remove the brush holder.

- Remove the housing of the starter device with the stator.
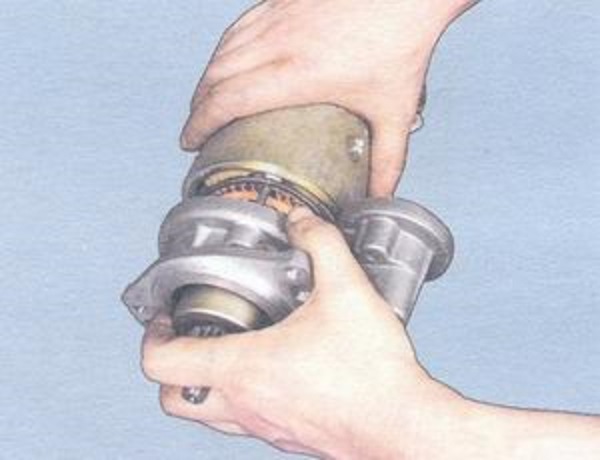
- Remove the plastic stop lever.

- From the drive side, remove anchor from the starter cover.

- We remove the intermediate support from the anchor tree.

- Remove the starter ring from the starter drive.

- Remove the plate washer.

- Remove the stubborn puck.

- Remove the clutch with the lever.

- Remove the stubborn ring.

- We turn over the two fastening screws of the relay cover.

- We turn off the nuts from the relay contact bolts.

- With the help of a soldering iron, we disconnect the relay terminals both with the windings.

- Remove the relay cover.

- Remove the sealing ring.

- Take out the contact plate with the rod.
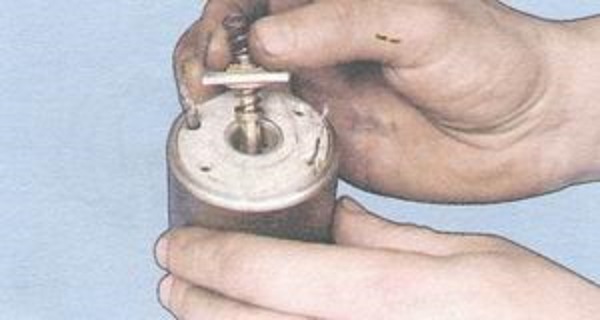
- Remove the return spring from the rod.

- Remove the lock ring.
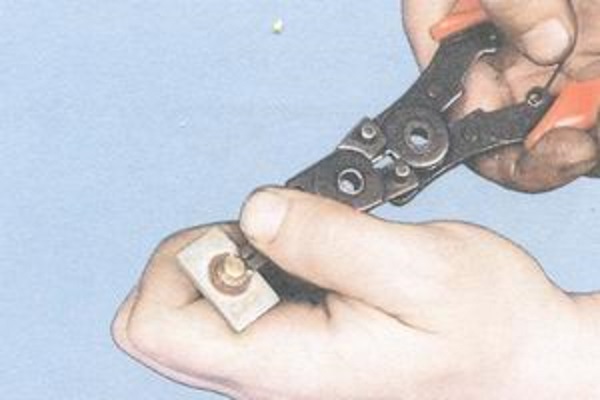
- Remove an insulating washer.

- Remove the contact plate.

- Remove the insulating sleeve.

- Remove the washer.

- Remove the damping spring.

- Take the contact bolts from the relay cover.

Repair work when disassembling the starter VAZ 2109
Order of work:
- Clean all the elements of the starter from pollution.
- Check the stator winding, for which you should turn on the control light with a voltage of 220 V to the AC circuit and connect the wire to one output of the stator winding, and the other end of the chain close to the housing. If the light burns, the insulation of the winding is damaged. We change the stator or winding. In the same way, check the second stator winding.

- We inspect the anchor of the starter. If there are scratches, risks or it is dirty, stabbing it with a glass skin (shallow). With a significant roughness of the collector, or if mica performances are present between the plates, you need to pump a collector on the lathe and stabilize with a glass skin (shallow).

- If there is an anchor anchor with a yellow bearing, you need to remove it with a shallow eye, otherwise it will entail the gear jamming. If on the surfaces of the slots and a tap of the shaft of the shaft, zadira, replace the anchor of the starter.

- Check the reliability of soldering outlets of the winding winding to the collector plates. We look at the winding of the anchor at the ends of the anchor. It is important that the diameter of the winding is less than an anchor iron package. If it is more, anchor is subject to replacement.

- Check the anchor winding with a 220 V voltage in a voltage circuit. Connect the wires to the anchor core, as well as to the collector plate. If the light lights up, then there is a closure of the collector plate or the anchor winding on the "mass". In this case, we change the anchor.

- Holding the overtook coupling, check the gear in different directions. It is worth noting that the starter gear should be freely rotated only clockwise. When turning the gear on both sides, you need to replace the starter drive.

- We wear an anchor actor drive on the shaft. It is important that the starter drive is freely moved along the shaft slots.
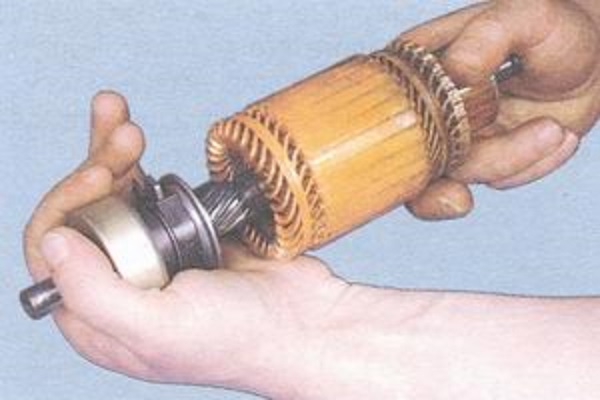
- With wear or substantial damage to the starter drive elements, you should replace the drive. If there are fears on the landing part of the teeth, it is necessary to strengthen their fine-grained sandpaper of small diameter.

- We inspect the intermediate support and the header cover from the collector. If cracked appeared on the intermediate support and the laid of the starter, they should be replaced with them. Also inspect the bushings in the starting lid and intermediate support, where the anchor shaft rotates. If you have found strong wear or mechanical damage, replace the intermediate support or the starter cover with defective sleeves.
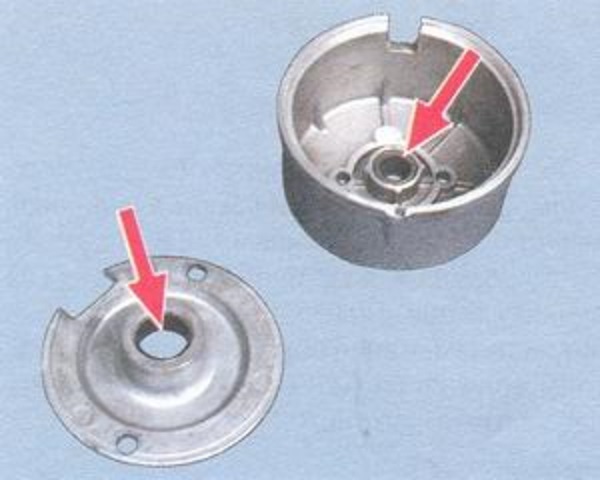
- We inspect the clutch crankcase sleeve. If there is a sleeve on the sleeve, shells or signs of wear, replace the sleeve.

- Starter brushes, which are worn to height less than 12 mm, must be replaced.

- Check how brushes are moved in holders. They should easily move, without jail. Also check the fastening of brush holders. It is important that they are fixed firmly and securely.

- It is necessary that the holders of the brushes do not have a "mass" closure. This can be checked with a control lamp.

- Dynamometer check the force of springs that press the starter brushes. To do this, insert anchor into the cover of the starter device from the drive side, mount the housing and the brush holder. We insert the brush into the belt holders. At the time when the spring is broken from the brush, the force should be 9.0-11.0 N.

- Ommeter Check the resistance of the winding of the retractor relay. The resistance of the holding winding should be 0.725-0.795 ohms, and the retractive - 0.52-0.59 ohms at air temperature +15 - +25 degrees. Anchor relay should easily move in the housing.

- We inspect the contact bolts of the relay cover. The burnt heads of the bolts. Clean the shallow eye. If the heads burned hard, expand the bolts 180 degrees so that they pressed to the plate in the unbearable side. With a strong wear of the surface of the contact plate, it can be rotated to the contact bolts with the other side.

How to collect and install the starter VAZ 2109
The starter assembly is performed in the reverse order. When assembling, do the following:
- The conclusions of the windings must be reliably soldered to the terminals of the relay.
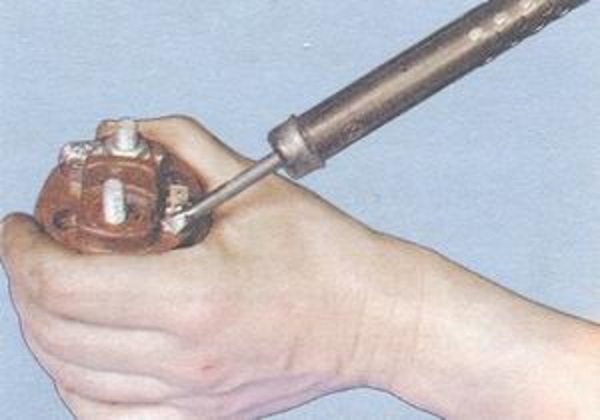
- Lubricate the trough and slots of the shaft anchor of the starter.

- Next, lubricate the intermediate support sleeves and the back of the starter.

- Then lubricate the armature tip relay ...

- ... and the slots of the overtaking clutch.

- By selecting adjusting washers, adjust the axial gap of the shaft of the anchor of the starter device. It should be no more than 0.5 mm.

- Support on the lever is mounted by a ledge to anchor.

- It is necessary that tie studs pass through insulating tubes.

- When you connect the lever to the anchor tip, it is important that the tongue on this tip is directed down.

Tips Prof.
We recommend to see the next video:
Related Materials
- Stove 2110, bad warm stove 2110, VAZ 2110 heating system, repairing the heating system VAZ 2110 with their own hands
- VAZ 2114 stove blows with cold air, stove 2114, bad warm stove VAZ 2114, device and repair of heating VAZ 2114 do-it-yourself, removing the stove VAZ 2114
- How to subdominize the car. How to put a jack. Types of jacks for cars.
- VAZ 2109 Fuse Block, VAZ 2109 Fuse Block Carburetor, VAZ 2109 Fuse Block Injector, Old VAZ 2109 Fuse Block, VAZ 2109 Fuse Block, VAZ Fuse Block 2109
- Car exhaust gas catalyst, faulty catalyst, pluses and cons of the catalyst, how to change the catalyst on the planeencitel
- Stove blowing cold air VAZ 2114, badly blowing the stove VAZ 2114, why badly blowing the stove VAZ 2114
- How to find out the owner of the car by the number of his car, check the car by the number of the traffic police machine, check the car by the state number of the car for free
- How to choose Used tires, Useful Tips
- Winter car road, pressure in passenger car tires in winter, good battery for the car in winter, whether to warm the car in winter
- In winter, the car is poorly started. How to make a car in winter, do you need to warm up the car in winter, useful tips
- Economy fuel consumption machines, the most economical car consumption
- Tires brands for passenger cars, labeling of car tire labeling, residual passenger car tire protector, how to pick a tire on a car brand, car tire tread pattern
- Working transmission operation, mechanical gearbox clutch work, driving with manual gearbox, useful tips
- Rear beam Peugeot 206 sedan, rear beam device Peugeot 206. Rear beam Peugeot 206 Malfunction, repair of the rear beam Peugeot 206
- Diesel fuel in winter, additive for diesel fuel in winter, how to choose the best diesel fuel
- Diesel winter does not start. How to start diesel in winter, heating diesel in winter.
- Japanese bridgestone tires, winter studded bridgestone tires, bridgestone tires brand
- Tire marking decoding for passenger cars, labeling wheels, how to choose the right tires on the disks
- Diesel engine in winter, launch of the diesel engine in winter, what oil to fill in a diesel engine in winter, useful tips
- LED backlight of the car, the backlight of the bottom of the car, the backlight of the legs in the car, the backlight in the door of the car, the backlight of the car is fine
- Recovered tires, bus tire, restored tire protector, can I use them
- Choose winter tires, which is a winter tires, which pressure in winter tires should be marked with winter tires, how to choose the right winter tires, the best winter tires 2019
- Steering rail rail, knock of steering rack, reasons for the knock and repair of the steering rack do it yourself
- Cameless car tires, a set for repair of tubeless tires, repair of the cannon-free tire do it yourself
- Russian tires, Russian tires Winter, Russian All-season tires, Voronezh AMTEL tires, Tires "Matador Omsk Tire", Kama-tires are world-class bus
- How to open a car without a key. Lost the key from the car what to do, the key from the car inside the car
- Silent tires, quiet winter tires, quiet studded bus, which tires to choose, overview tires
- Tires and safety, safety of the bus, why it is necessary to constantly monitor car tires
- Rules of safe driving of the car in the rain and slush, safe driving of the car for beginners
- Rust converter which is better for cars, rust converters to choose how to use rust transducer, professionals
- Polishing the body of the car do it yourself, how to choose a polishing paste, useful tips
- Engine durability, engine life, how to extend engine life
- Knock in the car. Knock when moving the car. What can knock in the car. How to determine the cause of the knock.
- ABS car, what is ABS car, ABS system malfunction, ABS diagnostics
- Overtaking a car when you can start overtaking a car, rules of traffic rules
- Fuel pump VAZ 2110, VAZ 2110 gas station scheme, VAZ 2110 fuel pump device, VAZ 2110 gas station repair,
- Automotive antennas for radio, automotive antenna device, car antenna do it yourself
- Front suspension Kalina, device front suspension Kalina, knock in front suspension Kalina, repair of front suspension Kalina
- Shock absorber Oil, best oil shock absorbers, pumping oil shock absorbers, how to properly pump oil shock absorber
- Clutch malfunctions, touches clutch, causes a clutch malfunction, how to eliminate




Comments