The generator is the main component of the electrical system, since it is this node that feeds all the equipment and consumers. Problems in the functioning of the generator can deliver serious inconvenience to the motorist. About this further in the article.
Content
- Generator 2107, device and principle
- Signs of Malfunction Generator VAZ 2107
- The main causes of the VAZ generator
- Tools, fixtures, consumables
- Choosing a workplace
- Dismantling of the generator (step by step)
- Disassembling the generator and repair of the generator (in detail)
- How to assemble the generator and install in place (step by step)
Generator 2107, device and principle
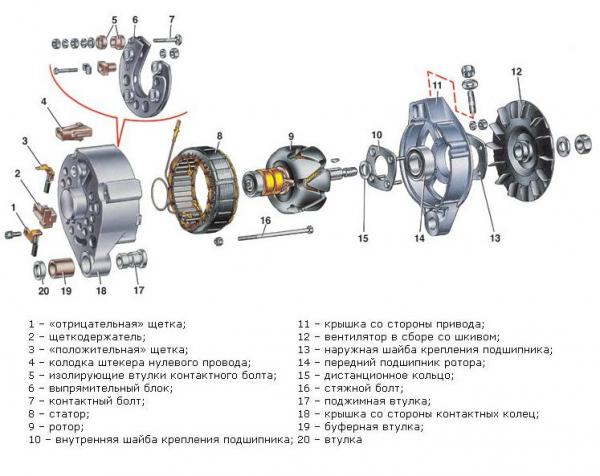
The generator includes:
- Rotor.
- Stator.
- Two bearings.
- Built-in rectifier.
- Three-level voltage regulator.
- Two aluminum alloy covers.

The unit is on the right of the power unit, and is attached to the engine bracket with two bolts. The generator converts mechanical energy that appears during the rotation of the crankshaft, electrical. The resulting electrical energy is needed to recharging the battery and power of the on-board network. AC transformation into a permanent force of 80 amps is due to the rectifier block, which consists of six diodes.
Voltage supports three-level regulator. When the driver includes ignition, the voltage passes through the control light bulb and reaches a three-level regulator, after which it comes to the excitation winding. This process is shown in the following scheme.

The main elements of the onboard network are marked with the following figures: Battery (1), generator (2), mounting unit (3), ignition lock (4), voltmeter, measuring voltage (5), Light bulb controlling battery (6).
Signs of Malfunction Generator VAZ 2107
The main signs of the malfunction of the generator:
- Continuous flickering or a bull view of the battery discharge of the battery with the engine running.
- Battery reload or full discharge.
- Weakly audible beep or dim lightweight glow with an engine running.
- Outsided sounds (howl or squeak) emanating from the generator.
- Significant change in the brightness of the lanterns with increasing the number of revolutions. This option is considered to be permissible if there is an increase in revolutions (that is, Peregazovka) from the XX mode, but it should not rise more after bright headlights, remaining at the same level.
The main causes of the VAZ generator
- The stress generator brushes (tablets) were worn. This problem is one of the most common and most common in domestic seven. These devices are consumables, so one way or another will wear out.
- Overheat the winding inside the device. In this case, the repair is to replace components that have failed, but it is not always possible to rewind the windings.
- The unit of the unit was damaged, in particular, we are talking about mechanical damage. As a result, moisture will fall into the device, which destroys the elements installed inside.
- Bearing elements were worn. If the bearings were worn out, the operation of the device will be accompanied by an increased creak or noise. Sometimes the problem can be solved by adding lubricant to bearing devices, but this helps not always.
- Broken diode bridge.
- He was damaged or pulled out. It will not be possible to restore the performance of pulley by dismantling and repairing, the device is replaced.
- Open drive belt. Under the influence of time, the strap is wears, because of which its intensive use can lead to a cliff.
Tools, fixtures, consumables
- The key to "10".
- The key to "17".
- The key to "8".
- Mandrels for knocking out and pressing bearings.
- Bearing puller.
- End key.
- Screwdriver.
- Head on "10" with a ratchet. "
Choosing a workplace
The generator replacement is more convenient to perform the bottom of the vehicle. To do this, you will need to unscrew the boot that protects the car. You will need an observation pit or lift.
Dismantling of the generator (step by step)
- To begin with, disconnect the minus terminal from the battery.
- Next, disconnect the connector from the generator (the thermostat and battery are pre-dismantled in the photo).
- Remove the insulation case from the terminal. Using the key to "10", unscrew the terminal and disconnect the wire.
- Loosen the generator fastenings and remove the belt.
- Using the key to "17", push the adjustment bar.
- Unscrew the bottom mount nut and remove the bolt with the sleeve.
- Remove the unit.

Disassembling the generator and repair of the generator (in detail)
- Using the end key, unscrew the nut, which secures the impeller and pulley, holding the rotor with a screwdriver.
- Steps from the shaft pulley, and then the impeller of the fan. Remove the key and pull out remote washers.

- Dispatch the voltage controller relay, after unscrewing the fastening screws. Disconnect the wire block.
- Pull the voltage regulator from the housing with the brushes node.
- Using the head to "10" with a ratchet, unscrew the nuts that fasten the generator cover, remove the bolts.

- Then we sweep the lid about the wooden bar and, by hitting the rubber hammer on the shaft, run the front cover.
- Remove the lid and remove the remote sleeve.
- Check the front ball bearing, for which you hold firmly cover, turn your fingers and shake the bearing itself (that is, the inner ring of the ball bearing).
- When the excess backlash is detected or if the bearing is broken, replace it with a new one.
- To replace the defective ball bearings, unscrew its fastening nuts using the key to "8".

- Remove the fastening washers and bolts that fasten the bearing.

- Select a suitable mandrel (i.e., get out) and select the bearing (see photo).

- Take two wooden lumps, pour the edges of the back cover in them and with the help of a soft metal, bulk the rotor. If damage the surface of the covers, it is necessary to process them with an abrasive circle.

- Check the wellness of the rear ball bearing method described in 8 points.
- If you need a replacement, make it up from the rotor using the puller.
- Using the head on "8" with a ratchet and extension, unscrew the fastening nuts of the diodes block, as well as the conclusions from the stator winding.
- Remove the bolts and pull the stator out of the cover.
- Check the integrity of the stator winding. If the winding is damaged, replace it or rewind.

- Remove the generator output nut with a washer made of insulating substance.
- Remove the diode bridge itself.

- Cross screwdriver unscrew the screw that creates the capacitor, and remove it. Remove the third bolt from the cover, which crept the rectifier block.

- Check the stator with the rotor using the control lamp.
How to assemble the generator and install in place (step by step)
- Before starting the assembly, clean all the elements from dirt and dust, and then blow them with air with the compressor. Metal parts are desirable to rinse with gasoline.
- We press the rotor to press the new bearing using a mandrel, the diameter of which corresponds to the diameter of the inner ring of the bearing.

- Inspect the bearing seats. They should not be damage.
- Cracked covers replace new. The assembly is performed in the reverse order.
Related Materials
- Stove 2110, bad warm stove 2110, VAZ 2110 heating system, repairing the heating system VAZ 2110 with their own hands
- VAZ 2114 stove blows with cold air, stove 2114, bad warm stove VAZ 2114, device and repair of heating VAZ 2114 do-it-yourself, removing the stove VAZ 2114
- How to subdominize the car. How to put a jack. Types of jacks for cars.
- VAZ 2109 Fuse Block, VAZ 2109 Fuse Block Carburetor, VAZ 2109 Fuse Block Injector, Old VAZ 2109 Fuse Block, VAZ 2109 Fuse Block, VAZ Fuse Block 2109
- Car exhaust gas catalyst, faulty catalyst, pluses and cons of the catalyst, how to change the catalyst on the planeencitel
- Stove blowing cold air VAZ 2114, badly blowing the stove VAZ 2114, why badly blowing the stove VAZ 2114
- How to find out the owner of the car by the number of his car, check the car by the number of the traffic police machine, check the car by the state number of the car for free
- How to choose Used tires, Useful Tips
- Winter car road, pressure in passenger car tires in winter, good battery for the car in winter, whether to warm the car in winter
- In winter, the car is poorly started. How to make a car in winter, do you need to warm up the car in winter, useful tips
- Economy fuel consumption machines, the most economical car consumption
- Tires brands for passenger cars, labeling of car tire labeling, residual passenger car tire protector, how to pick a tire on a car brand, car tire tread pattern
- Working transmission operation, mechanical gearbox clutch work, driving with manual gearbox, useful tips
- Rear beam Peugeot 206 sedan, rear beam device Peugeot 206. Rear beam Peugeot 206 Malfunction, repair of the rear beam Peugeot 206
- Diesel fuel in winter, additive for diesel fuel in winter, how to choose the best diesel fuel
- Diesel winter does not start. How to start diesel in winter, heating diesel in winter.
- Japanese bridgestone tires, winter studded bridgestone tires, bridgestone tires brand
- Tire marking decoding for passenger cars, labeling wheels, how to choose the right tires on the disks
- Diesel engine in winter, launch of the diesel engine in winter, what oil to fill in a diesel engine in winter, useful tips
- LED backlight of the car, the backlight of the bottom of the car, the backlight of the legs in the car, the backlight in the door of the car, the backlight of the car is fine
- Recovered tires, bus tire, restored tire protector, can I use them
- Choose winter tires, which is a winter tires, which pressure in winter tires should be marked with winter tires, how to choose the right winter tires, the best winter tires 2019
- Steering rail rail, knock of steering rack, reasons for the knock and repair of the steering rack do it yourself
- Cameless car tires, a set for repair of tubeless tires, repair of the cannon-free tire do it yourself
- Russian tires, Russian tires Winter, Russian All-season tires, Voronezh AMTEL tires, Tires "Matador Omsk Tire", Kama-tires are world-class bus
- How to open a car without a key. Lost the key from the car what to do, the key from the car inside the car
- Silent tires, quiet winter tires, quiet studded bus, which tires to choose, overview tires
- Tires and safety, safety of the bus, why it is necessary to constantly monitor car tires
- Rules of safe driving of the car in the rain and slush, safe driving of the car for beginners
- Rust converter which is better for cars, rust converters to choose how to use rust transducer, professionals
- Polishing the body of the car do it yourself, how to choose a polishing paste, useful tips
- Engine durability, engine life, how to extend engine life
- Knock in the car. Knock when moving the car. What can knock in the car. How to determine the cause of the knock.
- ABS car, what is ABS car, ABS system malfunction, ABS diagnostics
- Overtaking a car when you can start overtaking a car, rules of traffic rules
- Fuel pump VAZ 2110, VAZ 2110 gas station scheme, VAZ 2110 fuel pump device, VAZ 2110 gas station repair,
- Automotive antennas for radio, automotive antenna device, car antenna do it yourself
- Front suspension Kalina, device front suspension Kalina, knock in front suspension Kalina, repair of front suspension Kalina
- Shock absorber Oil, best oil shock absorbers, pumping oil shock absorbers, how to properly pump oil shock absorber
- Clutch malfunctions, touches clutch, causes a clutch malfunction, how to eliminate


Comments