The key node in the vehicle electrical network is deservedly considered the generator. This device provides power to all car energy consumers, ranging from radio tape recorder and optics and ending with various auxiliary devices, such as, for example, the recorder and navigator. One of the main components of this mechanism is the generator stator, which will be discussed in the article.
Content
Device and principle of generator stator
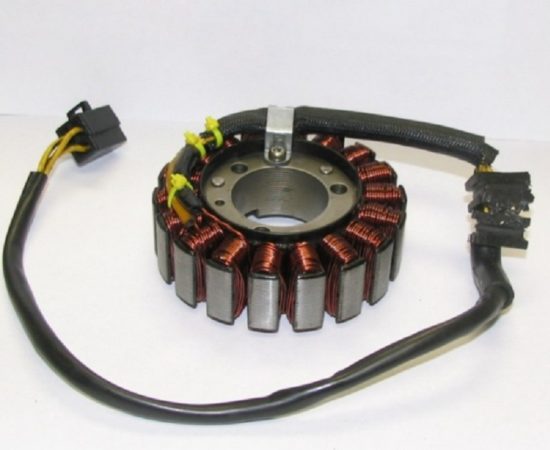
The stator consists of such components:
- Package or core.
- Stator winding.
- Conclusions for connecting to a rectifier device.
The stator design includes three windings where 3 different alternating current values \u200b\u200bare formed. This scheme is a three-phase conclusion. One end of each winding is connected to the generator housing, and the second is connected to the rectifier device. To enhance and concentrate the magnetic field in the winding components, the wire from each winding is paved around the core, made in the form of metal plates.
The stator winding is located in special grooves, which are often 36. The winding in the groove is fixed using a groove wedge, which is also made of insulating material.
Stator malfunctions: Causes and Signs
In the work of the stator there may be two versions of the breakdown: closing the windings for a mass or a break in windings. Due to the temperature differences and the long influence of humidity on the end side of the core, insulation can be stamped. This can cause a closure, as well as the accelerated exit of the unit fail. Not depending on the reason, the symptom of the breakdown is one - the generator ceases to function normally, problems occur in its work, the device is also not able to generate a current.
Diagnostics of the generator stator using a multimeter
The generator stator can be checked for closure or cliff.
To diagnose the cliff, you will need a test lamp or a multimeter:
- Tester take the tester. It must be activated in an ohmmeter mode. Provisions Connect to the winding conclusions. In the absence of a break in the device, the tester will display the following resistance value on the display - about 10 ohms. But if there is a break in the device, the current will not be able to go to the windings, which means the resistance value will rush to infinity. In this case, check all three outputs.

- In the case of diagnostics, the control lamp must be made from the acb negative charge on the winding, or rather, one of its contacts. To do this, you will need insulated wire. And the positive charge is supplied through the control lamp to another contact. Now pay attention to the lighting source. If he began to burn, then the device works fine. And if not, it means there is a break in the system. Repeat the verification procedure for each output.
The diagnosis for the presence of a short circuit is also performed using a lamp or tester:
- Set the multimeter to the module mode. Connect the negative tester probe to the Stator. Positive dipstick connect with any contact winding. Repeat the procedure with each output.
- The diagnosis of the control lamp is performed similarly. Connect the negative contact of the AKB with the output of the stator, and positive - with any contact of the winding. The burning lamp will indicate the presence of a short circuit in the mechanism. If the lamp will not burn, then the device works fine. Diagnosis is performed with each conclusion.
Rewinding the generator with your own hands, instructions for the rewinding of the generator stator
Order of work:
- First, disassemble the generator and get a stator from it.
- Feed the available windings so that they burn, however, count the number of turns and make the appropriate scheme to rewind. At the stator, at the same time tick the findings of the findings to the end and starting the winding.

- After combustion, cleaning is performed.
- Then with the help of materials such as pressspan or Sintoflex, cut the insulating gaskets. It is important that they performed from the ends of the groove by 2.5-3 millimeters. When you make one laying and fit it under the dimensions, you will need to cut off a piece of tape in accordance with its length or width. Next, using this gasket, cut off 36 pieces of identical length and install them in the grooves.

- After that, rewind is performed. Its essence is based on the Wire from one groove wave immediately in the fourth. When half of the turns are wound on the same phase, start to get out in the opposite direction, but it is necessary to overlap the empty parts of the semi-cake. In the same way all phases are wound.

- When the phases are already rewinding, set the fake parts in the grooves. The protruding parts of the semi-rounded should not perform outside the fastening borders and inside the border of the metal. To do this, turn the coil through spacers.

- Sample the stator device in the generator lid to ensure that the windings are not in contact with the housing. If there is a touch, get rid of it.
- Clean and connect the conclusions of the winding elements, for which they need to be twisted with each other and secure. They also need to be insulated, for which you can use the textile cambrick.
- Before the direct connection, make sure there is no short circuit. If you have a closure, detect the contact location and exhibit it, for which you will need another gasket.

- Next, tie the winding component and fix its contacts with a cord thread. If it is missing, you can use the flax thread, but do not use the Kapron, as it melts when drying and flows.
- The stator must be heated a bit for drying and place in the container where you need to pre-pour impregnating varnish or similar substance. It is impossible to use furniture varnish.

- When the device is soaked, it should be suspended and waited for some time until it stands all the varnish.
- Then place the device in the usual oven and adjust it to minimal heating. The stator is preferably suspended and installed under it old tiles. Wait one hour. If the lacquer will stop sticking at this time, then it is necessary to dry the device at such a temperature for another two hours.
Conclusion
As you can see, the rewind of the stator as a whole is a rather painstaking and complex procedure, to cope with the execution of which not everyone may be. The fulfillment of this event will take at least four hours.
Related Materials
- Stove 2110, bad warm stove 2110, VAZ 2110 heating system, repairing the heating system VAZ 2110 with their own hands
- VAZ 2114 stove blows with cold air, stove 2114, bad warm stove VAZ 2114, device and repair of heating VAZ 2114 do-it-yourself, removing the stove VAZ 2114
- How to subdominize the car. How to put a jack. Types of jacks for cars.
- VAZ 2109 Fuse Block, VAZ 2109 Fuse Block Carburetor, VAZ 2109 Fuse Block Injector, Old VAZ 2109 Fuse Block, VAZ 2109 Fuse Block, VAZ Fuse Block 2109
- Car exhaust gas catalyst, faulty catalyst, pluses and cons of the catalyst, how to change the catalyst for the planeencitel
- Stove blowing cold air VAZ 2114, badly blowing the stove VAZ 2114, why badly blowing the stove VAZ 2114
- How to find out the owner of the car by the number of his car, check the car by the number of the traffic police machine, check the car by the state number of the car for free
- How to choose Used tires, Useful Tips
- Winter car road, pressure in passenger car tires in winter, good battery for the car in winter, whether to warm the car in winter
- In winter, the car is poorly started. How to make a car in winter, do you need to warm up the car in winter, useful tips
- Economy fuel consumption machines, the most economical car consumption
- Tires brands for passenger cars, labeling of car tire labeling, residual passenger car tire protector, how to pick a tire on a car brand, car tire tread pattern
- Working transmission operation, mechanical gearbox clutch work, driving with manual gearbox, useful tips
- Rear beam Peugeot 206 sedan, rear beam device Peugeot 206. Rear beam Peugeot 206 Malfunction, repair of the rear beam Peugeot 206
- Diesel fuel in winter, additive for diesel fuel in winter, how to choose the best diesel fuel
- Diesel winter does not start. How to start diesel in winter, heating diesel in winter.
- Japanese bridgestone tires, winter studded bridgestone tires, bridgestone tires brand
- Tire marking decoding for passenger cars, labeling wheels, how to choose the right tires on the disks
- Diesel engine in winter, launch of the diesel engine in winter, what oil to fill in a diesel engine in winter, useful tips
- LED backlight of the car, the backlight of the bottom of the car, the backlight of the legs in the car, the backlight in the door of the car, the backlight of the car is fine
- Recovered tires, bus tire, restored tire protector, can I use them
- Choose winter tires, which is a winter tires, which pressure in winter tires should be marked with winter tires, how to choose the right winter tires, the best winter tires 2019
- Steering rail rail, knock of steering rack, reasons for the knock and repair of the steering rack do it yourself
- Cameless car tires, a set for repair of tubeless tires, repair of the cannon-free tire do it yourself
- Russian tires, Russian tires Winter, Russian All-season tires, Voronezh AMTEL tires, Tires "Matador Omsk Tire", Kama-tires are world-class bus
- How to open a car without a key. Lost the key from the car what to do, the key from the car inside the car
- Silent tires, quiet winter tires, quiet studded bus, which tires to choose, overview tires
- Tires and safety, safety of the bus, why it is necessary to constantly monitor car tires
- Rules of safe driving of the car in the rain and slush, safe driving of the car for beginners
- Rust converter which is better for cars, rust converters to choose how to use rust transducer, professionals
- Polishing the body of the car do it yourself, how to choose a polishing paste, useful tips
- Engine durability, engine life, how to extend engine life
- Knock in the car. Knock when moving a car. What can knock in the car. How to determine the cause of the knock.
- ABS car, what is ABS car, ABS system malfunction, ABS diagnostics
- Overtaking a car when you can start overtaking a car, rules of traffic rules
- Fuel pump VAZ 2110, VAZ 2110 gas station scheme, VAZ 2110 fuel pump device, VAZ 2110 gas station repair,
- Automotive antennas for radio, automotive antenna device, car antenna do it yourself
- Front suspension Kalina, device front suspension Kalina, knock in front suspension Kalina, repair of front suspension Kalina
- Shock absorber Oil, best oil shock absorbers, pumping oil shock absorbers, how to properly pump oil shock absorber
- Clutch malfunctions, touches clutch, causes a clutch malfunction, how to eliminate


Comments